| |||
|
|
|||
 | |||

Stardust 1/26 Scale Model
Version 1.5
|

|
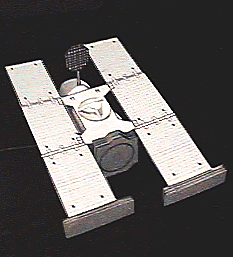
This is a detailed scale model of the Stardust Spacecraft, which is flying its mission to sample and return matter from a comet. Assembly is a project which is probably not appropriate for people younger than about ten years of age, depending on skill and motivation. The image above shows a completed scale model.
The Parts Sheets are available to download from the same web site offering these instructions:
A. YOU'LL NEED THE FOLLOWING:
- White paper card stock (also called "cover" stock, about the thickness of a postcard) which your computer's printer can accept (or, if your printer can't accept card stock, maybe you can find a copy machine which will, so you can copy the parts sheets from plain paper to card stock).
- Scissors, to cut some parts from the parts sheets.
- A pair of miniature long nose pliers.
- An art knife, such as X-Acto #11, with a sharp new blade, and a proper pad on which to cut. This will be needed to cut some parts from the parts sheets, and to trim sections of soda straw. Adult supervision is required for children using sharp tools. Caution: one can injure oneself, as well as the furniture, with an art knife! You can avoid injury by being very careful, by cutting in a way that does not move the blade towards your skin, and by asking an experienced person for help.
- Wooden toothpicks for applying glue.
- Scotch Tape or equvalent.
- Glues. Use regular white glue (Elmer's Glue-All or equivalent). You might instead try a thick white glue, sold in art and fabric stores, called "TACKY GLUE" (Aleen's or equivalent).
You will also need a glue stick (UHU or equivalent) which has a low moisture content (these instructions will show you when to use it).
- Space. Set up a well lighted, comfortable work area, with room to set glued parts to dry.
- Time. Plan to set aside several hours for unhurried assembly. It may take eight hours or more to assemble your Galileo Scale Model.
- Patience. There may be some trying times. If so, remember that extra time and care will pay off with a surprisingly accurate, and handsome representation of NASA's Stardust spacecraft.
- Optional: Some gold material would add realism to your model. Stardust was equipped with gold-colored blanketing for thermal control and micrometeoroid protection. If you want to add this detail, you'll be on your own: look at all the pictures of the Stardust Spacecraft on the web, and add the gold-colored blanketing your model as accurately as you can. Gold-colored foil/paper, such as gift wrap is one choice of material for this. Another may be aluminized yellow plastic film, such as you might find in a metallic colored helium balloon.
- Optional:
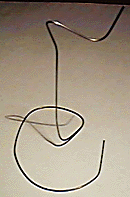
 You may wish to fashion a stand for your model. A simple stand can be made by bending a length of wire. Brass wire from a hobby store, or steel wire such as coat hanger wire, will work. About half a meter, or 18 inches, in length is plenty. Such a stand may also be convenient to support parts during assembly. If you choose to work with wire, be cautious to prevent eye injury. This image shows a stand made of soft iron wire obtained from a craft store.
- Optional: You might find it helpful to use an electric hair drier to set the glue in some places. If you do, be very careful not to blow the pieces apart.
B. BEFORE BEGINNING ASSEMBLY:
- Go to the Introduction Page to download and print the Parts Sheets onto white card stock. You might also wish to print these instructions, if it isn't convenient to refer to your computer during assembly.
- Examine all the parts, and read their names.
- Read all of these instructions. Compare model parts with the illustrations.
- Have a look at some information about the Stardust Spacecraft and its mission.
C. IN GENERAL:
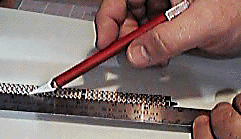
 Scoring will help make a neat model, with straight, clean folds. To score a part, place a metal straight edge along the line on the part as instructed, then lightly scratch along the line with an art knife, guided by the straight edge. Be careful not to cut through the paper, but just break the surface. You almost don't have to press down at all with the sharp art knife. After scoring, the fold will be in the direction away from the scored side.
D. TO ASSEMBLE YOUR MODEL:
Click on each step below for illustrated step-by-step instructions. Sections marked with a * may be accomplished at the same time if two or more people are working on assembly, or if you wish to work on one section while glue dries on another.
* 1. Assemble the Solar Panels.
* 2. Assemble the Spacecraft Bus.
3. Build and Install the High Gain Antenna.
4. Build and Install the Sample Return Capsule.
5. Install the Solar Panels.
E. YOU'VE FINISHED YOUR STARDUST MODEL.
Now that you're familiar with the names of all of the spacecraft's major structures, and its instruments, be sure to thoroughly use the Stardust web site to learn more about the spacecraft and its mission.F. ABOUT YOUR STARDUST MODEL:
Your model's scale is approximately 1/26. The model's Solar Panels cannot support themselves in Earth's gravity, while the spacecraft's can. Therefore, your model has stiffeners underneath the panels.Please feel free to copy this scale model, and disseminate it widely.
Have you built the 1/37 Scale Cassini model? There's also the very realistic 1/45 scale Galileo model. Many others are available, too. Just use a search engine, and look for various spacecraft models on the web.
Model design by Dave Doody
An afterhours project. No tax dollars were harmed in the making of this model :-)
8 August, 1999
Sections marked with a * may be accomplished at the same time if two or more people are working on assembly, or if you wish to work on one section while glue dries on another.


| Webmaster: Ron Baalke |
