| |||
|
|
|||
 | |||

* 1. ASSEMBLE THE SOLAR PANELS.
View the whole assembled modelSee illustration of a completed Solar Panel at bottom of this page
- Print the Parts Sheets onto white card stock.
- Cut out a Solar Panel from Parts Sheet 1. Cut along the black outline, removing the part from the grey background.
- Cut out a Panel Stiffener from Parts Sheet 1. Using a straightedge, score lightly along its center line. Fold lengthwise, making it L-shaped in cross section.
- Apply glue using a glue stick outside along the length of one side of the Panel Stiffener. Use only a low-moisture glue to prevent warping. Press the glued Panel Stiffener along the center of the underside (the non-printed side) of the Solar Panel part. Adjust the panel so it is nice and flat.
(Note: the panel stiffener helps support the solar panel on your model in Earth's gravity. It does not appear on the actual spacecraft.)
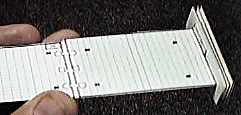
- Cut out the four rectangles of one Whipple Shield from Parts Sheet 1. As with all parts, flatten them after cutting out. Cut out one long thin rectangle labelled Shield Spacers from Parts Sheet 1.
- Cut the Shield Spacer at each of its five black lines, to make six small rectangles. Bend each tiny rectangle in half to form an L-shape.
- Glue two small L-shaped spacers to the L-shaped lines on a Whipple Shield rectangle. When dry, glue a second Whipple Shield rectangle down on top of the spacers, aligning it with the rectangle below it. Repeat this step, stacking up all four Whipple Shield rectangles, separated by L-shaped spacers. The top shield rectangle has no L-shaped lines.
- At the end of the Solar Panel, find the tabs labelled Y and Z. Cut between them, and fold one up 90 degrees, and one down. Apply glue to the outside of both tabs (the side facing away from the solar panel), and glue it to the completed Whipple Shield, centering it as shown in the image.
- Repeat the above steps to complete the second Solar Panel.

| GO ON TO THE NEXT STEP |
| INSTRUCTIONS FIRST PAGE |


| Webmaster: Ron Baalke |
